Overview
The client portal allows your clients the ability to login and see their contact information, contracts, events, invoices, and payments due. In addition, you can add forms for your clients to fill out and they can pay their invoices or payments due. Clients can access the portal either be an email provided by you or by embedding the client portal into your website. The client portal is HTML using a responsive design so it should work on nearly any screen size.
Features Supported In the Client Portal
- Personal Info
- This tab shows the client their contact info stored in StudioCloud
- If desired you can add an 'update info' button that will allow the client the option to update their contact info. You can decide what contact info you would like them to be able to change.
- Forms and Contracts
- This tab includes forms that the customer can fill out as well as contracts that they have signed or need to sign
- Event History
- This tab includes all of their sessions, events or appointments.
- Invoice History
- This tab includes all of their invoices. They can pay any balance due on those invoices by clicking on the 'Pay Now' button
- Payments Due
- This tab includes any outstanding payment dues that were setup for the client. They can pay these payment dues by clicking on the 'Pay Now' button
How to Customize The Client Fields Displayed In The Client Portal
- Click on Clients
- Click on the Settings tab
- Click on the 'Customize Client Fields' button
- Click on the 'Client Portal Options' tab
How to Setup a Clients Password
Note: a client can request a password directly from the portal.
- Edit the Client
- Enter the password for the client in the field called Portal Password
- If you do not see the portal password field you may have disabled it. Click here for a tutorial on how to customize the client fields.
- Click the Save button
How to Auto-Generate Client Passwords
This option will automatically generate a password for the client when they are created in the StudioCloud program
- Click on Clients
- Click on the Settings tab
- Click on the 'Customize Client Fields' button
- Click on the 'Additional Options' tab
- Check the "Automatically Generate Portal Password" checkbox
How to Add the "Client Portal" to your Website
Click here if you have a wordpress website for a wordpress tutorial
- Go to the Cloud Services component
- Click on the Cloud Settings tab
- Click the HTML5 Client Portal Button
- Change the options as necessary
- Copy and paste the HTML code (without changing anything in it) into a new HTML webpage within your website.
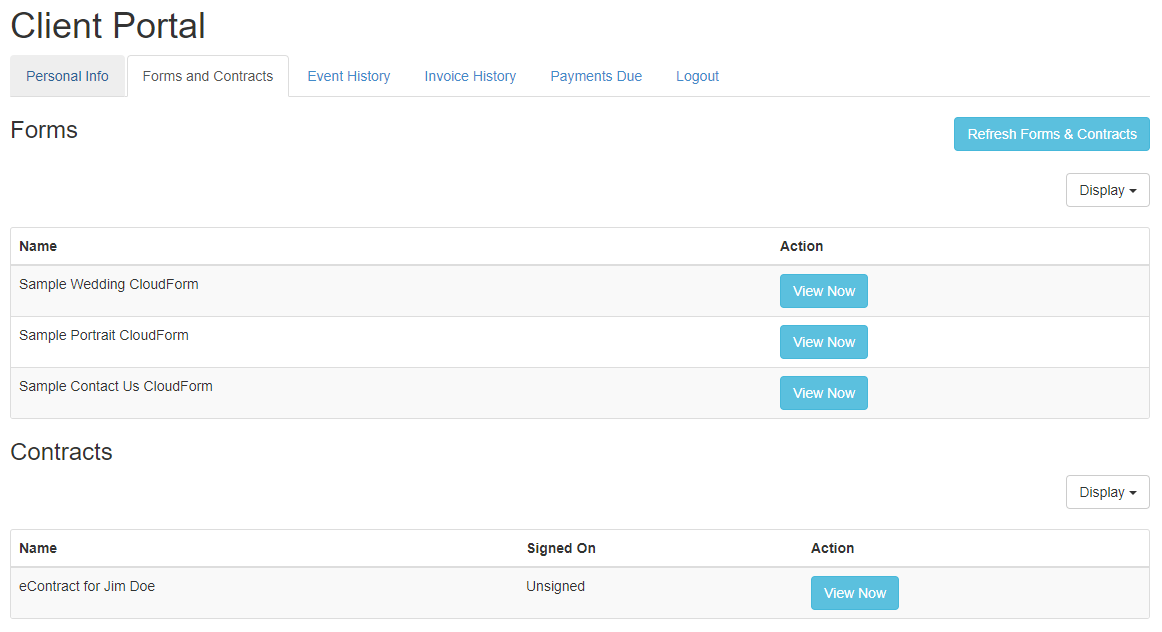
Example of CloudForms and Contracts listed in the Client Portal
Below is an example of CloudForms and signed contracts that a client can view in the Client Portal
How to Add CloudForms to the Client Portal
This will create a list of forms in the client portal that your customers can see and fill out.
- Created or edit a form using the instructions in How to Create/Edit a CloudForm
- Click the Include In Client Portal checkbox on the Details tab
- Click the Save button
How to Add a Contract to the Client Portal
The client portal will display all of a client's contracts. To add a contract to the portal create one using the instructions in Getting A Contract Esigned
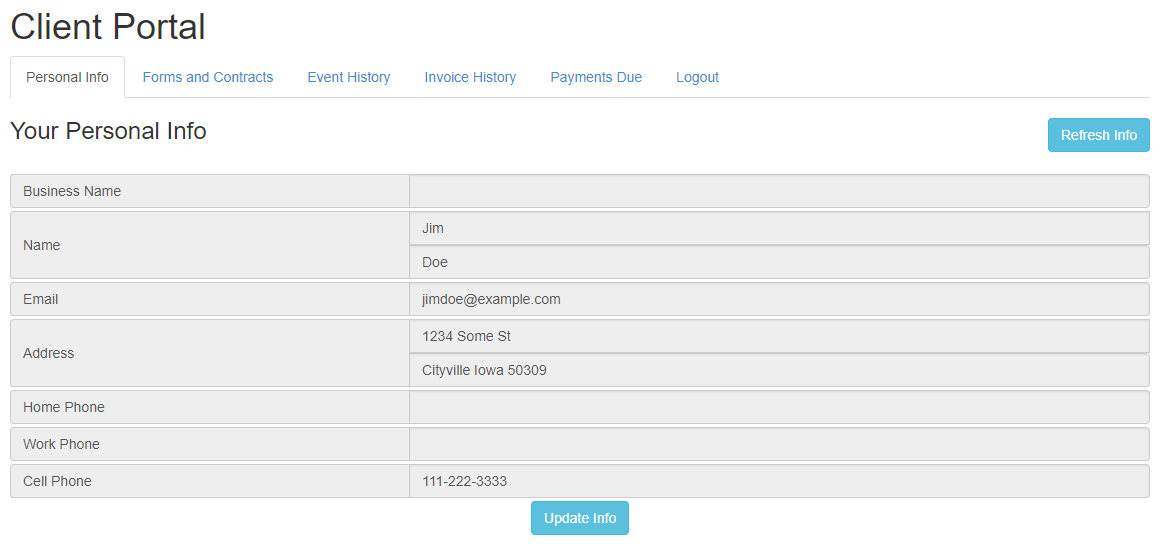
Example of Client Personal Info
Below is an example of the client information that a client can view in the Client Portal. To have a client update their information you can have them click on the "Update Info" button.
Please note that the "Update Info" button will not appear unless a CloudForm has been selected for it.
How to Add a CloudForm for clients to Update their Client Information
This will place a button on the client information page that will allow them to update their personal information using a form you have created.
- Created or edit a form using the instructions in How to Create/Edit a CloudForm
- Click the Default Update Form checkbox on the Details tab
- Click the Save button
How to Send an Email With The Client Portal Link In It
- Edit the Client
- Click on the Email menu option
- Click on the Send Email menu item
- In the send email window click on the Insert tab
- Click on the Insert Client Portal button
- Edit the email text and click the Send button
How to Add a Link to the "Client Portal" to an Email Template
- Create a new email template or edit an existing email template
- Click to learn how to create/edit email templates
- Click the location in the email template where you want the link inserted.
- Click on the Actions tab
- Click on the Insert Client Portal button
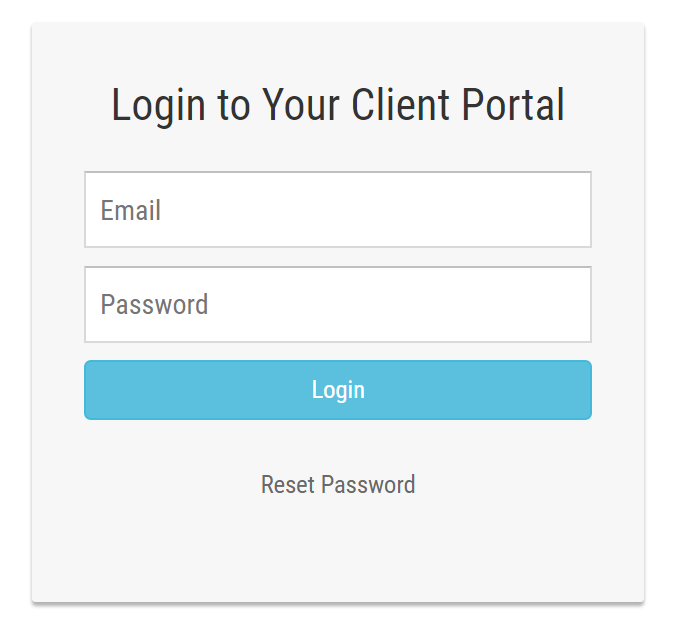
Client Login
Below is what the clients see as the initial client portal login. You can either create a password for them and email it to them or they can click the "Reset Password" link and create a new password.
What Do My Clients See?
Possible Issues with the Client Portal
There
are several types of errors that can occur with the client portal. The
errors that are occurring for a known reason are included below with an
explanation of the error message. If there is any other type of error
message then please contact support@studiocloud.com with your client portal and the client that
tried to login. Please note, if you embed the client portal on a
different page then please include the URL to that page.
Errors When Loading The Client Portal
There
are several errors that can occur when loading the client portal.
These errors are related to the status of your StudioCloud
subscription. If these errors occur your client will be given an error
code and the portal will be locked. Please contact
billing@studiocloud.com if you have questions regarding your
subscription. If you need to update your billing information you can do
so using the instructions here How do I update my billing information?
- Error 101 - This means that your subscription has expired. You will need to purchase a new StudioCloud subscription
- Error
102 - This means that the last payment for your subscription failed.
You will need to update your billing information in StudioCloud.
Errors When Logging In
- Unable to find your email address in the system
- This means that the email address they entered could not be found in
your StudioCloud account. The simplest explanation is that the client
entered the wrong email address but you may need to check your system
and make sure you have a client with that email address there.
- Found multiple records with the same email address - If multiple clients have the same email address in StudioCloud then they will not be able to use the client portal
- Invalid Password. Please try logging in again
- Unknown Error. Please try logging in again
- This issue will need to be reported to support@studiocloud.com with
your client portal and the client that tried to login. Please note, if
you embed the client portal on a different page then please include the
URL to that page.
 Categories