| |
| |
How to Use the Email Template Editor 2.0
OverviewThis tutorial explains how to use the web based email template editor. Background SyncThe web based email template editor requires that the email template be downloaded from the cloud to StudioCloud's desktop software using the background sync. As such changes that are made in the email template window can take a minute or two to appear in StudioCloud after the save button is clicked. How to Create Email Templates - Go to the Settings component
- Click on the General Settings tab
- Click the Email Templates button
- Click the New Email Template button
- Enter a template name
- Under the HTML Template Email tab Click the Email Template Editor 2.0 button
How to Edit Email Templates - Go to the Settings component
- Click on the General Settings tab
- Click the Email Templates button
- Edit the desired email template
- Under the HTML Template Email tab click Click the Email Template Editor 2.0 button
Email Template Editor Menu Options Below is a list of buttons in the email template editor 2.0 and what each one does. 
- Save Button
- This button saves the email template window.
- Cancel Button
- This button cancels all work in process and returns to the list of email templates.
- Help Button
- This button opens the tutorial that you are currently viewing.

- Cut Button
- Copy Button
- Paste Button
- Paste as Plain Text Button
- Undo Button
- Redo Button

- Spell Checker
- Enable SCAYT stands for "Spell Check As You Type". If you enable this option it will underline misspelled words.
- Check Spelling will open a window showing the misspelled words.

- Insert Link
- This option will add a link so that when a client clicks on it it will open to that web page
- Remove Link
- This removes the above link.
- Insert Anchor
- This option adds an anchor link to the email. It is typically used to jump from the top of the email to a specific location in the email. Usually it is only used with larger emails.
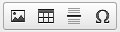
- Insert Image
- This option inserts an image into the email. You will need to either have the image stored in CloudStorage or in another online location and just add a link to the link in the email.
- Insert Table
- This option inserts a table into the email.
- Insert Horizontal Line
- This option inserts a horizontal line into the email.
- Insert Special Character
- This option inserts special characters into the email.
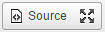
- View Source
- This option lets you view the html source.
- Maximize Screen
- This option maximizes the screen to have the email editor fill up the entire screen space.
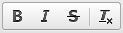
- Bold
- This option makes the highlighted text bold.
- Italic
- This option makes the highlighted text italic.
- Strike Through
- This option puts a line though the highlighted text.
- Remove Formatting
- This option removes the formatting for any highlighted text.
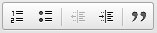
- Insert/Remove Numbered List
- Insert/Remove Bullet List
- Decrease Indent
- Increase Indent
- Block Quote

- Align Left
- Align Center
- Align Right
- Justify

- Styles
- This option provides various style options.

- Formatting Option
- This option provides various formatting options.

- Text Color
- Background Text Color

|
| |
|
 Categories