Overview
This tutorial will show you how to import your clients, prospective clients, or inquiries from a CSV file.
Limitations
StudioCloud only supports importing 22 columns from a csv file. If your csv file has more then 22 columns they will not appear in the import window. You will have to manually remove or merge columns together to be able to import them into StudioCloud.
Each column header can be adjusted in StudioCloud to import the correct information and, as such, the column order doesn't matter because you can change it in StudioCloud by clicking on the column header and selecting the correct information.
How to Convert an Excel File to CSV
Please see this Microsoft support article for help saving your Excel spreadsheet as a CSV file: http://office.microsoft.com/en-us/excel-help/import-or-export-text-txt-or-csv-files-HP010099725.aspx
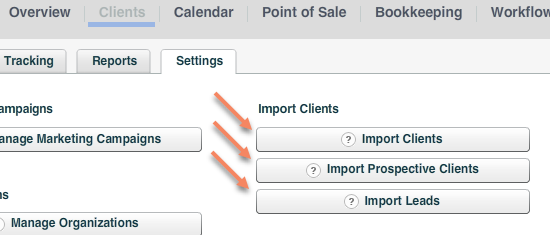
Step 1: How to Open the Import Clients, Import Prospective Clients, or Import Leads Window
- Go to the Clients component
- Click on the Settings tab
- Click on the Clients button
Step 2: How to Import Clients from a CSV File
- Click the Import Options button and select the Import Clients Window option
- In the Import Clients window click the Import Options button and select either Import from CSV (Comma Separated) or Import from CSV (Tab Separated)
- Select a CSV file from your computer
- Adjust the column headings as necessary to match the data that is displayed in each column
- Click the Save button
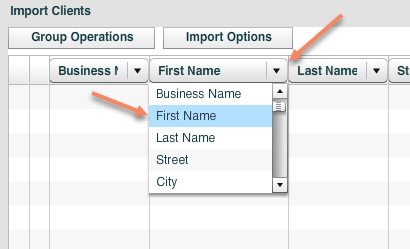
Step 3: Adjust the Column Headers
- Click on the Column Header
- Click the field that is the correct data to import.
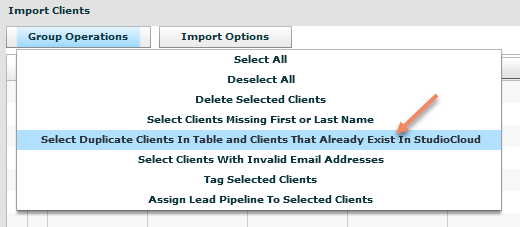
Step 4: Remove Duplicate Clients In Needed
- Click on the 'Group Operations' menu
- Click on the 'Select Duplicate Clients In Table and Clients That Already Exist In StudioCloud' menu option
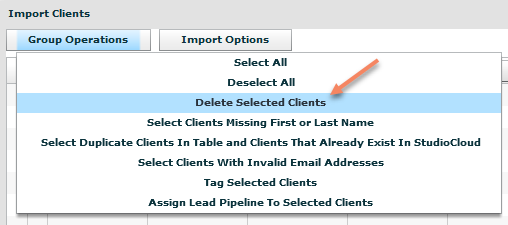
- Click on the 'Group Operations' menu
- Click on the 'Delete Selected Clients' menu item
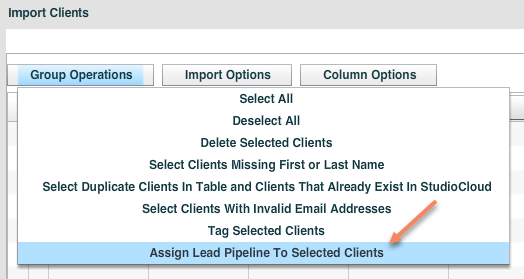
How to Assign a Lead Pipeline to the Imported Clients
- Click on the 'Group Operations' menu
- Click on the 'Select All' menu option
- Click on the 'Group Operations' menu again
- Click on the 'Assign Lead Pipeline To Selected Clients' menu item
Column Breakdown
StudioCloud supports importing the following columns
- Business Name
- First Name
- This field is required. If it is not populated StudioCloud will offer to automatically add the first name of "Unknown" during the import process.
- Last Name
- This field is required. If it is not populated StudioCloud will offer to automatically add the last name of "Unknown" during the import process.
- Street
- City
- State
- Zip/Postal Code
- Email
- Home Phone
- Work Phone
- Cell Phone
- The Cell Phone field is used to send automatic text message reminders.
- Notes
- You can have multiple note fields. It will automatically merge them together.
- Customer Number
- This is the number for the client. If you do not have a number to import StudioCloud will automatically assign a number for you.
- Tag #1
- This option is used to tag a client. In StudioCloud clients can have unlimited tags but StudioCloud only supports importing clients with up to 3 tags from a csv file. StudioCloud recommends that you use the group operations to make sure that you have the tag is spelled correctly.
- Tag #2
- This option is used to tag a client. In StudioCloud clients can have unlimited tags but StudioCloud only supports importing clients with up to 3 tags from a csv file. StudioCloud recommends that you use the group operations to make sure that you have the tag is spelled correctly.
- Tag #3
- This option is used to tag a client. In StudioCloud clients can have unlimited tags but StudioCloud only supports importing clients with up to 3 tags from a csv file. StudioCloud recommends that you use the group operations to make sure that you have the tag is spelled correctly.
- Birthday (DD/MM/YYYY)
- This field will import the birthday for the client. The date format has to have the day first, followed by the month, followed by the year. For example, 24/10/1990
- Birthday (MM/DD/YYYY)
- This field will import the birthday for the client. The date format has to have the month first, followed by the day, followed by the year. For example, 10/24/1990
- Anniversary (DD/MM/YYYY)
- This field will import the birthday for the client. The date format has to have the day first, followed by the month, followed by the year. For example, 24/10/1990
- Anniversary (MM/DD/YYYY)
- This field will import the birthday for the client. The date format has to have the month first, followed by the day, followed by the year. For example, 10/24/1990
- Parent ID
- This option is only used to link a client with another client. The Parent ID would be the customer number of a previously imported client.
- Gender
- This field is expecting to see either Male or Female
- Title
- This field can contain any text but would usually have Mr, Mrs, Dr., etc
- Country
- Custom Field #1
- This field can contain any text
- Custom Field #2
- This field can contain any text
- Custom Field #3
- This field can contain any text
- Custom Field #4
- This field can contain any text
- Custom Field #5
- This field can contain any text
- Custom Field #6
- This field can contain any text
- Client Pipeline
- This field would contain the name of an already existing client pipeline. StudioCloud recommends that you use the group operations to make sure that you have the client pipeline spelled correct.
How to Import Clients from a CSV/Excel Spreadsheet
Please see this Microsoft support article for help saving your Excel spreadsheet as a CSV file: http://office.microsoft.com/en-us/excel-help/import-or-export-text-txt-or-csv-files-HP010099725.aspx
- Open and login to StudioCloud
- Go to the Clients component
- Click on the Clients button
- Click the Import Options button and select the Import Clients Window option
- In the Import Clients window click the Import Options button and select either Import from CSV (Comma Separated) or Import from CSV (Tab Separated)
- Select a CSV file from your computer
- Adjust the column headings as necessary to match the data that is displayed in each column
- Click the Save button
How to Import Prospective Clients from a CSV/Excel Spreadsheet
Please see this Microsoft support article for help saving your Excel spreadsheet as a CSV file: http://office.microsoft.com/en-us/excel-help/import-or-export-text-txt-or-csv-files-HP010099725.aspx
- Open and login to StudioCloud
- Go to the Clients component
- Click on the Prospective Clients button
- Click on Import Options and select the Import Prospective Clients Window option
- In the Import Prospective Clients window click the Import Options button and select either Import from CSV (Comma Separated) or Import from CSV (Tab Separated)
- Select a CSV file from your computer
- Adjust the column headings as necessary to match the data that is displayed in each column
- Click the Save button
How to Import Leads from a CSV/Excel Spreadsheet
Please see this Microsoft support article for help saving your Excel spreadsheet as a CSV file: http://office.microsoft.com/en-us/excel-help/import-or-export-text-txt-or-csv-files-HP010099725.aspx
- Open and login to StudioCloud
- Go to the Clients component
- Click on the Leads button
- Click on Import Options and select the Import Leads Window option
- In the Import Leads window click the Import Options button and select either Import from CSV (Comma Separated) or Import from CSV (Tab Separated)
- Select a CSV file from your computer
- Adjust the column headings as necessary to match the data that is displayed in each column
- Click the Save button
Keep Your Clients Organized With Tags
Some businesses keep track of their clients with certain identifiers, or "tags". When you import your clients into StudioCloud, you can also import up to three tags for each client.
Importing Data with Relationships
StudioCloud supports relationships for clients, prospective clients, and leads. If you want to import client data with relationships then you will need to follow the steps below. For the sake of the steps below we will assume that you are importing family data with Parents and Children. However, this is applied for any data that you are importing with relationships.
- Split the data into two separate CSV files. One containing the parent information and a second containing the child information
- Import the parent data first. Please note, you must import this data and let all of the data sync to your computer before you import the child data
- Add a column to the CSV file with the child data for the parent id. Update the parent id for each child based on the information that was imported
- Import the child data file being sure to select the "Parent ID" column header for the new column containing the parent id for the child
 Categories