| |
| |
How to Reconcile your Accounts and Mark Ledger Entries as Completed
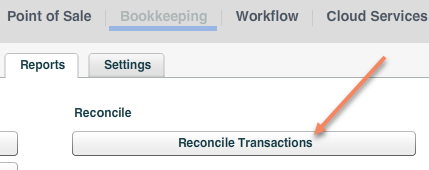
OverviewThis article explains how to reconcile your accounts in StudioCloud with supporting documents from your bank. This ensures that all income and expense ledger entries have been properly accounted for. How to Open The Reconcile Transactions Window and Load The Ledger Entries - Click on the Bookkeeping component
- Click on the Reports tab
- Click the Reconcile Transactions button to open the Reconciling Transactions window
- Select the Account you want to reconcile
- Select the Time Frame that matches with your bank statement.
- Enter the bank statement ending balance in the Statement Ending Balance field
How to Mark A Ledger Entries as Completed or Reconciled - Match the transaction in StudioCloud with the transaction in your bank statement.
- Click the checkbox in StudioCloud for the matching transaction
- As you do this the Select Amount will increase which allows you to see the total amount of the transactions you have selected.
- Note: The Difference amount will not change until the ledger entry has been marked completed/reconciled
- Repeat step 1 and 2 until you are ready to mark the ledger entries as completed/reconciled
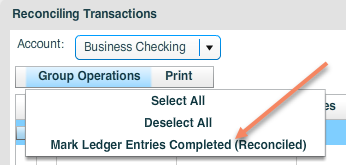
- Once you are ready to mark the ledger entries as completed do the following steps:
- Click on Group Operations
- Click on the Mark Ledger Entries Completed (Reconciled) menu option
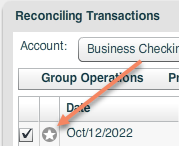
- When a ledger entry has been marked as completed/reconciled a star icon will appear and the Difference amount will change.
- Continue marking ledger entries as completed/reconciled until the Difference amount is $0.
|
| |
|
 Categories