Overview
This tutorial explains how to integrate a CloudForm into your website.
How to Embed a CloudForms into a Wordpress website
If you have a wordpress website click on the link below to learn how to embed the CloudForm into your website.
Click here for a tutorial on how to embed CloudForms into a Wordpress website
Option 1: Link from Your Webpage To Form (Fastest Method But Customers Have To Click A Link To See Form)
Note: You may need your web developer to add the links for you if you are not familiar with website development. In addition, if you have a flash website you will also need your web developer to add the code for you.
- Click on the Cloud Services component
- Click on the CloudForms tab
- Click on the Manage Forms Button
- Click on the Select Actions button and then click on the Copy Form Link button for the desired CloudForm
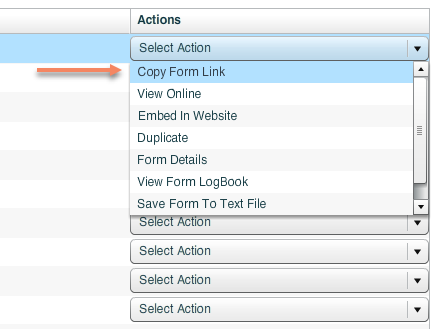
- Copy the form link that appears and add it as a link to your website.
- The link should look similar to the following: http://cloudforms.co/?scid=GNLS6OM305L56517&fid=231
Option 2: Embedded Form Into Website Using iFrame (Fast and Easy Method)
Warning: StudioCloud does not support finding visual issues when using this method if the CloudForm looks fine when outside the website. If there is a visual issue the most likely issue is that the website has code that is altering the CloudForm.
Note: You may need your web developer to add the code for you if you are not familiar with website development. StudioCloud allows you to embed the form directly into your website. This means when your customers go to your website they will see the form directly in your website. This will allow your customers to fill out a form without ever leaving your website.
- Click on the Cloud Services component
- Click on the CloudForms tab
- Click on the Manage Forms button
- Click on the Select Actions button and then click on the Embed In Website button for the desired CloudForm
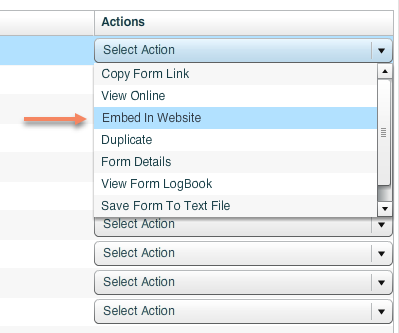
- Copy and paste the code located under the 'embed cloudforms code' header into your website
- If you experience an issue with scroll bars showing up on your website please select the radio button called 'Set Exact Width and Height' and select the desired width and height.
- StudioCloud recommends starting with a width of 800 and a height of 1600 and then adjusting the width and height until the scroll bars no longer show up on your website.
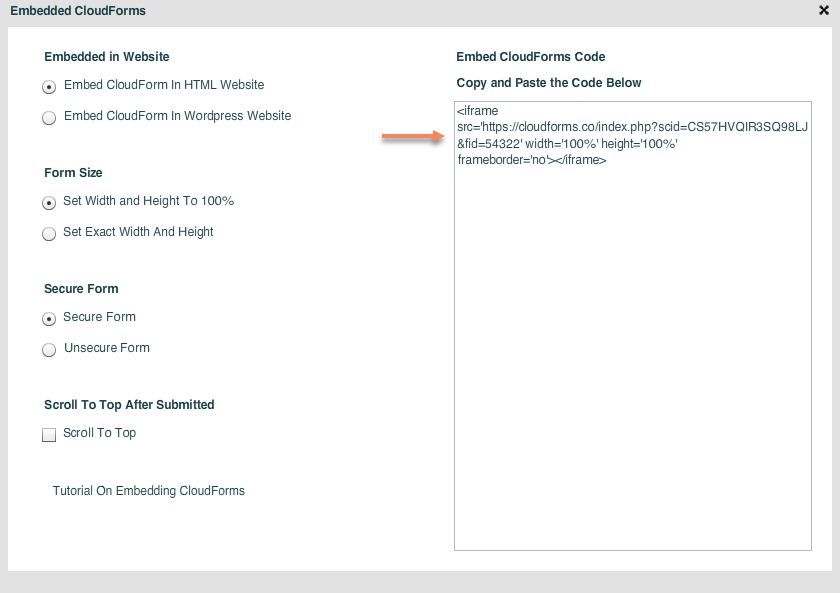
- If the cloudform requires a payment we recommend setting the 'scroll to top' option which will automatically take the client from the bottom of the form to the top of the form where the payment window is shown.
Option 3: Embedded Form Into Website Using HTML Code
Warning: This option is not recommend or supported by StudioCloud
Note: You may need your web developer to add the links for you if you are not familiar with website development.
StudioCloud does not provide support for this option.
StudioCloud allows you to embed the form directly into your website.This means when your customers go to your website they will see the form directly in your website. This will allow your customers to fill out a form without ever leaving your website.
- Click on the Cloud Services component
- Click on the CloudForms tab
- Click on the Manage Forms button
- Click on the Select Actions button followed by the Save Form to Txt File button for the desired CloudForm
- Copy and paste the html code in the file into your website
 Categories