eContract templates are used to generate a contract for a client to electronically sign online. eContracts can be emailed or text messaged directly to a client or they can be added to a CloudForm so that after the client fills out the cloudform the contract is automatically generated for the client to eSign with the information from the cloudform.
How to Create/Edit eContract Templates
StudioCloud requires that a contract template be created first. Once a template is created a personalized contract can be created for a client.
Click on the Settings component
Click on the Settings tab
Click the eContract Templates button
Click the New eContract Template button
Enter an eContract Template name
Enter in the information for the template
Use the Template Fields tabs to add place holders for information that will be automatically populated based on the use of the document
Click the Save button
How to Forward the Client to a Payment Page after they eSign a Contract
StudioCloud will automatically forward the client to a payment page after they sign a contract if either of the two criteria's are met.
The contract is associated with an invoice that has a balance due
The contract is associated with an invoice that has a payment due
How to add eContract templates fields to a Contract Template
The eContracts support 3 types of eContract template fields
Add Logo or Image
This option will add a logo or image to the contract
Add Text
This option will add text to the contract
Add Table
This option will add a table made up of 1 or 2 columns to the contract
How to Insert fields into the Contract
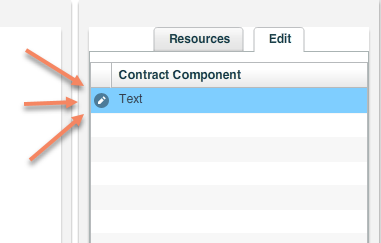
Add or Edit the Text component that is part of the contract
Refer to the image below for the button you would click on.
Click on the Fields Tab
Click on the desired field
Here is an Overview of the Contract Fields
Logo
This will insert the logo into the contract
General fields
This will insert the current date and time into the contract
Business Fields
This will insert your business information into the contract
Clients Name, Address, Phone, Fields, Social Media, and Client Custom Fields
This will insert the clients information into the contract
Event Fields
This will insert the event information into the contract
Event Address, City, State, and Zip/Postal Code Fields
This will insert the address that is associated with the event. The screen shot below shows which information from the event will be inserted into the contract
If a location is scheduled this field will not insert the location's address into the event. Refer to the Scheduled Event Fields below for information on how to do that
Scheduled Event Location
Event Employee Names
This field will insert the names of any scheduled employees into the contract
Event Location Names
This field will insert the names of any scheduled locations into the contract
Event Equipment Names
This field will insert the names of any scheduled events into the contract
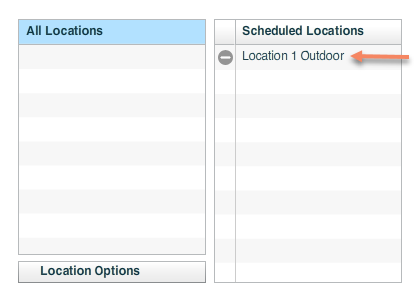
Event Location Address
This field will insert the address of any scheduled location into the contract. The screen shot below shows the scheduled location that will be used to populate this field. The address associated with the scheduled location will be inserted into the contract.
This field will not insert the address associated with the event. Refer to the Event Fields above for information on how to do that
Event Expires
This field will insert the date and time when the event expires which is useful if you want a customer to know how long they have to sign the contract before they lose their scheduled time slot
Invoice Fields
This will insert invoice information into the contract
Ordered Items Fields
This will insert a table into the contract with the ordered items
Single Payment Due Fields
This will insert information regarding their first payment due into the contract
All Payment Due Fields
This will include a table of the clients payment plans associated with their invoice
Project Fields
This will insert project information into the contract
Order Shipping Fields
This will insert the shipping information associated with the invoice into the contract
How to Email a Contract from the Client, Prospective Client, or Lead window
 Categories